Saturday, December 02, 2006
Starting another round of work on the Dart
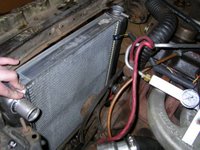
 Today I brought the Dart back into the garage and got to work on installing the Griffin radiator and doing something about my jury rigged intake plumbing. The circle track radiator looks like it will be just about the perfect size; I'd measured the stock radiator and found one that was almost the exact same dimensions. It looks like the brackets are meant to mount on the top and bottom of the radiator, rather than side-mounting it. But this should be pretty straightforward. I'll just have to drill a few mounting holes for the brackets, plumb in the external transmission cooler, and get some new radiator hoses as the outlet's not in the same spot. This radiator looks like it ought to be up the task, although being a circle track radiator, the look is more functional than polished. Griffin claims radiators of this size ought to be adequate for 400 hp.
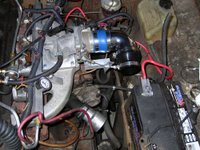
I tore out all of the first effort at intake plumbing except the rubber coupler on the turbo outlet, and I suspect its days are numbered too. It looks like I will need to add a 45 degree elbow on the end of that 90 degree piece. The elbow is a Spectre part that looks like metal; I was a bit disappointed to find that it's actually chrome plated plastic. I had also picked up one of Spectre's "Air Sensor Adapters" that was supposed to work with GM sensors. I'm not sure what sort of GM sensor it's supposed to work with, but it sure isn't the GM intake air temperature sensor with a 3/8" NPT thread like what I have on the Dart. I may just drill that adapter out and thread it, though.
I'll be putting in an intercooler at the same time. I bought some cheap eBay speed parts for that. The parts seem to have been a mixed bag when it comes to quality - many of them are from Communist China, and, well, I've had a few rants about Maoist quality control. But I figured it's hard to make a bad intercooler as long as it doesn't leak, and Jerry has been running one of the HKS blow off valve knock-offs on the DIY Autotune MR2. Of course, after I bought the valve, Jerry then mentioned it has started to have vacuum leak issues.
The intercooler was one I bought from CX Racing, which also seems to be known as Just Intercoolers. They don't seem to have anything to do with racing Honda CX500s. I was pleasantly surprised when I opened the box - this one looks like a pretty well made piece so far. It has a nice polished finish and the welds look pretty good. If anything, it's a bit prettier than the Griffin radiator. Of course, that may just be that they're catering to a different crowd, CX to the show crowd and Griffin to racers in events where their cars often take a real beating.
My impression of the blow-off valve I bought wasn't quite as good. It's a knock-off of the HKS Super Sequential Valve. What I have seen so far isn't encouraging. An HKS valve is made from billet aluminum. That's somewhat overkill and rather pricey, but light and strong. The valve I bought is definitely not billet. It looks as if it's made from cast zinc at first glance, but I think it's simply cast aluminum with some sort of plating on it (An earlier version of this post stated it looked like cast zinc, but I think now there's aluminum under that plating). We'll see if this thing holds up or if I end up pitching it in a trash can and getting a real HKS.
Labels: Dodge Dart
Comments:
<< Home
Greg,
The radiator is a 22" x 19" Griffin circle track piece, part number 1-25182X. I'll have more details about what it takes to install it as this project goes on.
Matt
Post a Comment
The radiator is a 22" x 19" Griffin circle track piece, part number 1-25182X. I'll have more details about what it takes to install it as this project goes on.
Matt
<< Home


